
Aluminium insert glued into head tube and wenge cap glued top and bottom to give it a defined edge.
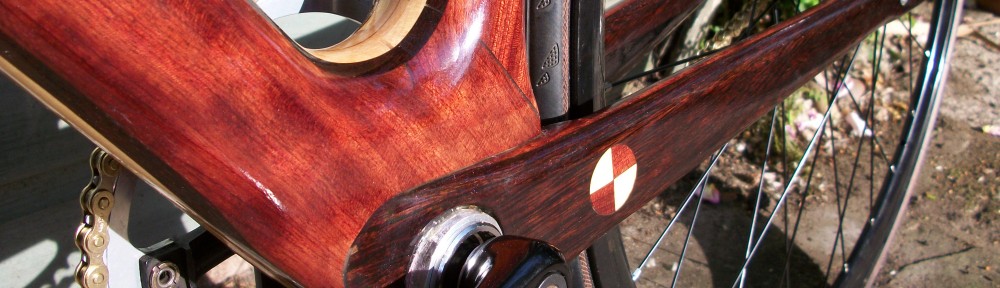
 Inlay roundel in the non drive side stay. It was supposed to look like the BMW logo (Bubinga, Wenge, Maple) but general concensus is that it looks more crash test dummies like. Which is probably more appropriate.

The finished frame gets 2 thin coats of epoxy resin and 3 coats of polyurethane varnish to finish it. This photo is after the first resin coat. It needs plenty of rubbing down between coats to achieve a perfect finish and allow each layer to bond to the previous.

Tape up the bits that you don’t want covered in varnish

I experimented with several different techniques for the logo including printing on to edible rice paper and tissue paper but neither of them gave a completely clear background. In the end I used Lasertran waterslide decal paper like this printed on an inkjet printer. I laid the printed sheet onto a thin layer of varnish and then varnished over the top to make the white background go clear. I’m quite happy with how it came out although you have to be super careful when sanding down between coats of varnish as the print is right on the surface.

Hola, me llamo Fernando, soy de España, me gustan las bicicletas, yo fabrico bicicletas para mi uso, llevo un tiempo ideando de hacerlas de madera, tenia de referencia a Renovo, su terminación es fantastica, me gustaria me informases de si tienes fotos o informes del proceso de laminado de renovo, ya que no encuentro nada por lnternet, te felicito por tu bicicleta, esta muy bien, ya me pasaras fotos de la terminación, un saludo
Fernando, thanks for the message. My Spanish isn’t so hot but Google Translate gave me a hand. I hope the photos in the construction pages give you some inspiration.
Hola Nick, me gustaria poder hacerte alguna pregunta en privado referente a la laminación de los cuadros, puedes contestar a mi correo abadfernando64@gmail.com, un saludo.
Hola Nick, me gusta la bicicleta terminada , el acabado es bueno, y el rotulo de Ligneus esta muy bien, te felicito, un saludo.
Fernando
Very beautiful bike! 🙂 You should be proud! Are you planning to build more bikes?
Gustav
Hi, AWESOME BIKE!
How did you secure the Bottom Bracket Shell into the frame?
Thanks,
Rob. C
Hi Rob,
Thanks! The bottom bracket shell is simply bonded into the frame with epoxy. The shell was roughened with a file beforehand and had several holes drilled in it to reduce the weight and also give a better mechanical bond to the wood. You can get chemical etching solution to help bond to metal but to be honest it won’t do a better job than roughening the surface with a file.
Hello,
your bike looks great, and this is a very inspirating project.
I want to ask, that do you have any problem with the frame since you use it?
Is it enough stiff and what is your other experience of use?
Thanks
Peter
The frame has held up fine so far and I’ve probably ridden well over 2000 miles on it now. It has been used for commuting, weekend rides and sportives and was used throughout the winter so has seen plenty of rain.
It’s plenty stiff enough although it is a bit heavy (2.5kg frame weight). The ride is very comfortable, as you will read about wooden frames elsewhere. Wood has very good damping properties and the high frequency vibrations from the road surface are much less noticeable than on a metal or carbon frame.
The varnish has held up well although it got several scratches from locking it up, putting it in the back of my car and general use. No problem though. 10 minutes with some light sand paper and a quick touch up with the varnish and it looks good as new!
I completed a 120 mile ride with 8000ft of climbing on it a couple of weeks ago. You can imagine the reaction from riders on geared carbon fibre bikes as I went past!
Hi Nick,
I am now in the final stages of finishing the two wooden frames that i am building (mountian bike & racer) both look great but took a lot longer than i expected even with the use of a cnc. I have coated them with west system 105/205 epoxy and rubbed down, iam now ready for the top coats of varnish. Can you tell me what make & type of poyurathane varnish you used as i have read that some poly varnishes can react with the epoxy. Thanks Russ.
Hi Russell
I used Ravilak marine varnish. It has a slight yellow hint to it so slightly darkens the wood coloring but has worked well so far. Send me some pics of your finished frames. I’d love to see them.
Cheers
Nick
Can I ask why you put a few coats of the epoxy on top of the surface? Just getting to this stage in the coming week! Why didn’t you just use a sand sealer or something similar!
Also I’m looking to use Yacht Vanish do you think this will work as well? Plus Satin or Gloss? Your looks like its Gloss. I find this shows the tiniest of imperfections how did you find it?
Cheers
Joe
The epoxy is harder than the varnish and supposedly penetrates the surface of the wood to give a tough finish. You’d get a really tough finish if you just used epoxy but its expensive and harder to achieve a perfect finish than varnish. Sand sealer is deliberately softer than varnish to make it easier to get a smooth finish.
Gloss v satin is personal preference. I don’t think there’s any benefit with one or the other.
Don’t forget to give it a couple of coats internally before you join the halves. This is important. And the outside finish just needs lots of coats and some elbow grease with fine grit sand paper.
The pics look cool! One question. Why the huge clearance between the rear wheel and the seat tube?